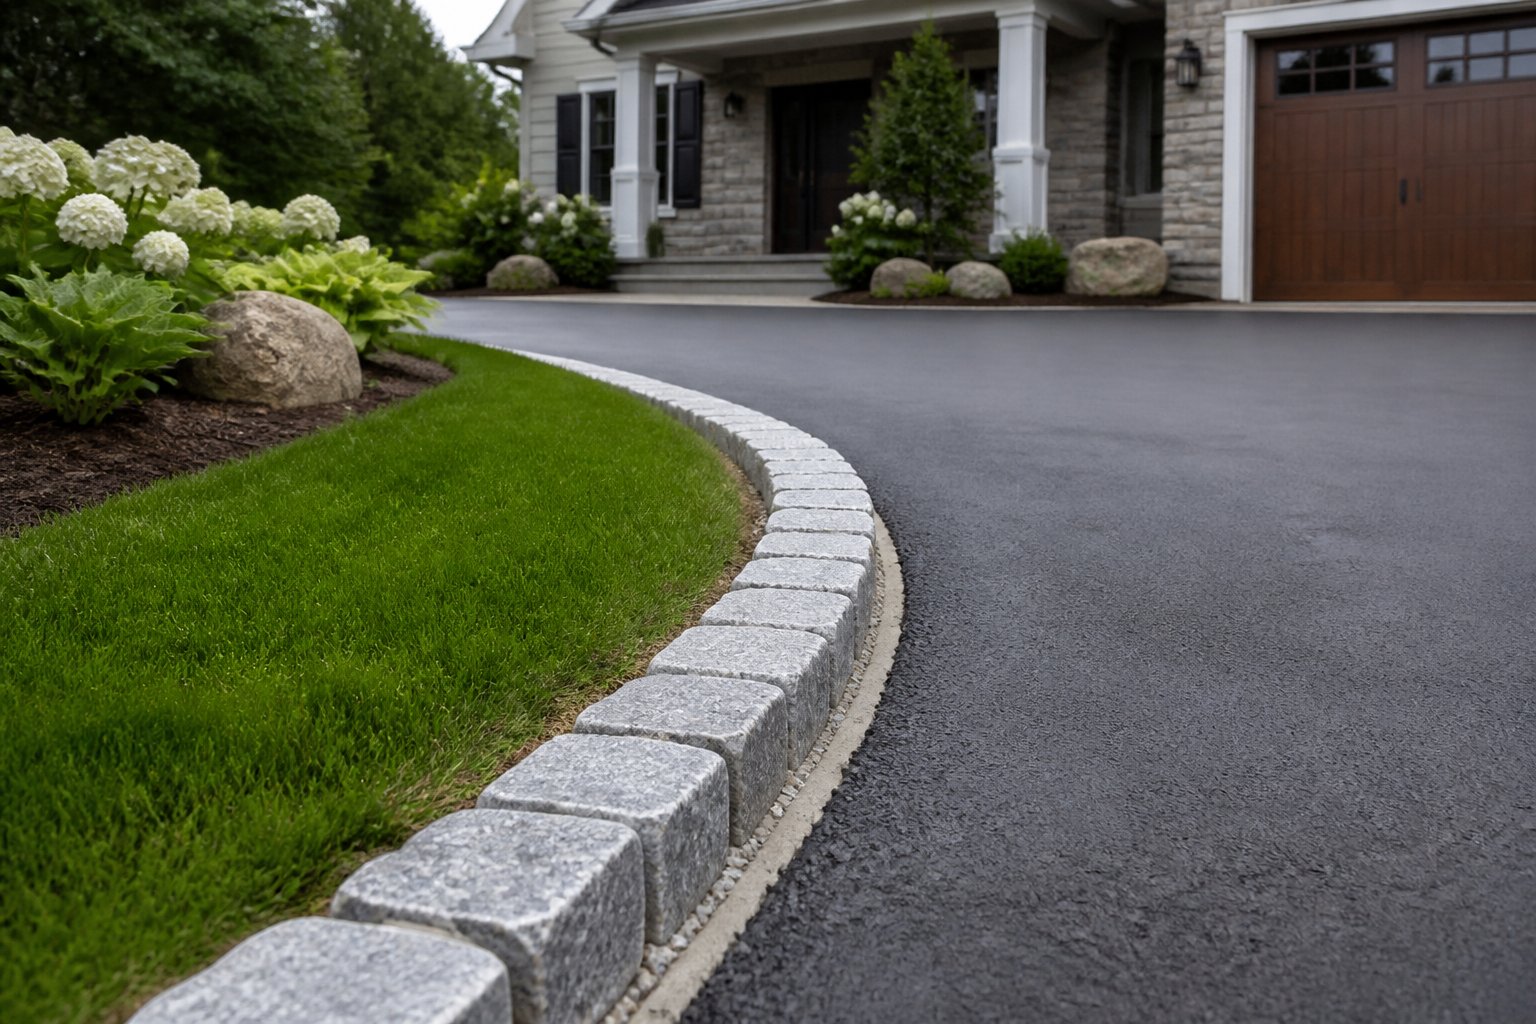
Your asphalt driveway is starting to crack and crumble along both edges, and the landscape plan needs a hard line between pavement and planting beds. Belgian block edging solves both problems at once.
A single course of granite or reclaimed stone blocks holds the pavement together, stops mulch from washing into the drive, and gives the whole approach a finished look that plastic edging never delivers.
The material matters as much as the method. Blocks pulled from century-old streets and structures carry weathered faces, earthy hues, and a hand-worn patina that new-cut stone cannot fake. That character is why designers keep specifying reclaimed cobblestone for driveway borders, walkways, and garden edges on high-end projects.
Keep reading to learn where this detail earns its keep, how to pick the right block size and shape, how to lay out the line and set a proper base, and how to set and maintain the finished edge. Do the base right, and that border will still be straight and tight long after the asphalt beside it has been replaced twice.
Where Belgian Block Edging Earns Its Place
Belgian block edging works hardest in three spots: the raw edge of an asphalt driveway, the transition between lawn and planting beds, and the joints where walkways meet other surfaces. Each use puts a different demand on the stone.
Protecting Asphalt Driveway Edges From Crumbling
Asphalt has no structural edge. Every tire that rolls off the pavement pushes the unsupported lip sideways until it cracks and breaks away. A course of granite blocks set in concrete gives that lip something solid to lean against.
Standard Belgian blocks run roughly 4 by 4 by 8 inches to 5 by 5 by 10 inches, which is deep enough to resist tire loads when properly bedded. Set the block so about 2 inches sit above the pavement surface. That reveal is enough to catch a wheel without becoming a trip hazard or a plow snag.
Defining Garden Borders and Holding Mulch
Belgian block garden edging does quiet work. It keeps mulch in the bed, keeps turf out, and gives a mower wheel a clean track to follow. For garden borders, you can set blocks tighter and shallower than driveway curbing since there is no vehicle load. Many designers run them soldier-style, long face out, for a wider visual line.
- Driveway curbing: blocks set on a compacted base with a concrete bed, 2-inch reveal
- Garden borders: dry-set on 4 inches of crushed stone, 3 to 4-inch reveal to hold mulch
- Bed dividers: blocks laid flat and flush for a mower-over edge
Framing Walkways, Aprons, and Landscape Transitions
Walkway edges and driveway aprons take foot traffic, hose drag, and snow shovels. Stone handles all three. Reclaimed brick works beautifully in these same locations, and many projects pair block borders with reclaimed brick patios and walkways inside the frame.
Aprons at the street benefit from the heaviest blocks you can source, since that is where delivery trucks cut the corner. Once you know where the stone is going, the next decision is which stone to use.
Choosing Blocks That Suit the Project
Not every squared-off stone is a Belgian block, and the differences change how the finished edge looks and performs. Shape, density, and origin all matter.
Belgian Blocks Versus Rounded Cobblestones
Belgian blocks are rectangular, split granite units with flat faces and square corners. True cobblestones are rounded field or river stones, worn smooth by water.
That difference is practical. Flat faces let Belgian blocks sit tight against each other with joints under half an inch, which makes a strong continuous edge. Rounded cobbles leave wide gaps that fill with weeds and shift under load.
- Belgian block: rectangular, split faces, tight joints, best for curbing and driveway edges
- Rounded cobblestone: irregular, wide joints, best for decorative fields and rustic paths
Why Reclaimed Stone Brings More Character Than Concrete or Plastic
Concrete curbing looks clean the day it cures and starts spalling within a decade. Plastic edging is worse. Per landscape guidance on Belgian block driveway edging, plastic edging tends to get pushed out of the ground by freeze-thaw cycles and needs reinstalling.
Reclaimed granite has already survived a century of weather and traffic. Its surfaces carry tool marks, mineral staining, and a depth of color that pigmented concrete only imitates. The comparison is much the same as reclaimed brick vs new brick. The aged material simply reads as real.
Selecting Size, Color Variation, and Block Orientation
Pick one nominal size for the whole run and accept the variation within it. Reclaimed stock will differ by a half inch here and there, which is part of the look. What matters is consistent depth so the tops line up.
Orientation changes the visual weight. Blocks laid with the 8-inch face parallel to the drive give a broad, calm line. Turned perpendicular, they read as individual stones and suit curves better. Choose the orientation before you start measuring, because it changes your block count.
Plan the Line, Grade, and Material Quantity
Layout comes before any digging. Get the line, the reveal, and the block count settled on paper, and the install goes fast.
Measure Straight Runs, Curves, and Driveway Flares
Run a measuring tape down both sides of the drive, then add the flare at the street and any turnaround. Count roughly 12 regulation blocks for every 5 feet of edging, then add 10 percent for cuts and breakage.
Curves need more blocks than the same distance in a straight line because joints open on the outside radius. Mark the curve with marking paint before you commit. Then walk it and check the sightline from the street.
Set a Consistent Reveal With Stakes and Mason's Line
Drive stakes at each end of the run, no more than 50 feet apart, and add intermediate stakes on long or uneven drives. Mark your target reveal on the stakes, then pull a mason's line taut between them.
Set the line at less than half the block depth above the pavement. With a 4-inch exposed face, that means 2 inches. Check the line with a level along the run and adjust before excavation.
Plan for Drainage Before Excavation Begins
A stone curb can dam water if you ignore the grade. Work from the high point downhill so runoff keeps moving. Leave a gap or a low block where sheet flow needs to escape into the lawn. Snap a chalk line inside the pavement edge where the asphalt will be cut. With the line set and drainage mapped, the base work can begin.
Build a Base That Keeps the Border Stable
The base does the real work. Blocks fail from poor bedding far more often than from the stone itself.
Excavate to the Required Depth and Width
Dig a trench roughly 12 inches wide and 8 inches deep along the pavement edge. Use a spade to keep the trench wall clean and load spoils into a wheelbarrow, since you will need some of that topsoil for backfill later. Trim the soil under the pavement flush with the cut asphalt edge. Any void behind the block invites settlement.
Compact Crushed Stone in Layers
Place crushed stone or gravel in two lifts of about 3 inches and compact each one. A plate compactor is faster; a hand tamper works fine on short runs and garden borders. Compact until the surface stops moving under the tamper. Loose base is the most common cause of a wavy edge two winters later.
Choose a Dry-Set or Concrete-Set Installation Method
Driveways get concrete. Garden edges usually do not.
- Concrete-set: stiff mix, roughly 3 parts sand to 1 part cement, about 20 feet of bed per 80-pound bag of cement
- Dry-set: blocks bedded in compacted crushed stone with stone dust joints, easier to reset later
Keep the concrete stiff so it does not squeeze up between the joints. With the bed ready, the stone goes down.
Set, Finish, and Maintain a Long-Lasting Edge
Setting blocks is repetitive work that rewards patience. Place, tap, check the line, move on.
Align and Seat Each Block Without Losing the Grade
Shovel a few inches of concrete into a 3-foot stretch, smooth it with a trowel, then set your first block tight against the pavement. Tap the top down to the mason's line with a rubber mallet.
Work in short sections so the bed does not stiffen ahead of you. End each run with a full block if you can. If the last stones will not fit, trim the final four by equal amounts with a concrete saw or a brick set so the change is not obvious.
Backfill, Secure Joints, and Blend the Landscape Edge
Sweep stone dust or ground limestone into the joint between the block and pavement. Skip regular sand, which attracts ants and washes out.
Backfill behind the blocks with the topsoil you saved, then seed or cover with mulch. On brick projects, the same finishing approach applies to reclaimed brick pavers set in a border pattern.
Avoid Settlement, Loose Blocks, and Drainage Failures
Wait for rain rather than hosing the joints. Rain carries stone dust deeper. A second application after a second rain locks the joints tight. Inspect the run each spring for frost heave. Reset any loose block in fresh concrete before the gap widens. Which brings up the one thing that stops most projects cold: having the stone on site when the crew is ready.
Confirm Reclaimed Stone Before the Installation Date
Reclaimed stone is finite. Every block came out of a real structure or street, so availability reflects what has actually been salvaged, not what a factory can run next week.
Check Current Reclaimed European Stone Availability Early
New Orleans Brick & Stone stocks reclaimed European Stone sold by the square foot, with pricing given over the phone. Call before you finalize the drawing set so your block size and quantity match what is genuinely on the yard. Ask about depth consistency and color range at the same time. Those two details drive how the finished edge reads.
Order by Phone and Coordinate Nationwide Freight Delivery
Orders ship on pallets by freight, curbside, unless you arrange otherwise. Once an invoice is paid, a truck can be on the road within 48 hours. This keeps a landscape crew from standing around.
Match the Material to Your Driveway or Garden Timeline
Plan stone delivery for after asphalt cutting and excavation, not before. Pallets sitting in the work zone slow everything down. If you are also specifying brick, review reclaimed brick cost early so the whole hardscape budget holds together.
Frequently Asked Questions
What Does Belgian Block Edging Cost per Linear Foot?
Material typically runs about $9 to $11 per linear foot for the blocks themselves. Professional installation on an average driveway lands near $1,350, depending on length, cuts, and how much old edging has to come out first.
How Do You Install Belgian Block Edging Along a Driveway?
Cut and clean the pavement edge, dig a trench about 12 inches wide and 8 inches deep, and compact crushed stone in two lifts. Then set blocks in a stiff concrete bed to a mason's line. Finish by sweeping stone dust into the joints and backfilling behind with topsoil.
Is Belgian Block a Good Choice for Driveway Edging?
Yes, because granite blocks bedded in concrete support the unsupported lip of asphalt that normally crumbles under tire loads. They also hold their shape through freeze-thaw cycles far better than plastic edging or poured concrete curbing.
What Is the Difference Between Belgian Block and Cobblestone?
Belgian blocks are rectangular split stone with flat faces and square corners: they lock together with tight joints. True cobblestones are rounded and irregular, which looks rustic but leaves wide gaps that invite weeds and shifting.
How Much Belgian Block Do I Need for My Driveway or Garden Border?
Figure roughly 12 regulation blocks per 5 linear feet, measured down both sides of the drive plus any flare at the street. Add about 10 percent for cuts, curves, and breakage.
Where Can I Buy Belgian Block Edging Near Me?
Reclaimed stone is not stocked in most local yards. Calling a dedicated reclaimed supplier is usually the fastest route. Freight shipping on pallets makes nationwide delivery practical, often within days of payment.
Stone That Outlasts the Pavement Beside It
A properly set course of Belgian block edging does two jobs at once. It keeps your asphalt from breaking apart at the edges, and it gives the driveway a finished line that looks like it has always been there. The base and the reveal decide how long that holds true.
Reclaimed stone is what makes the detail feel authentic instead of applied. Weathered faces, earthy tones, and a hand-worn patina come from a century of actual use, not a mold. That character is also why supply is limited to what has been physically salvaged.
If you are pricing a driveway border or a garden edge for this season, call New Orleans Brick & Stone at 225-284-7529 and check what reclaimed European Stone is in the yard right now. You will get real numbers, real availability, and a truck moving within 48 hours of payment.